Friday, December 18, 2009

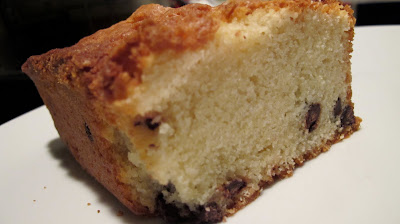
Chocolate Chip Pound Cake


Can you say "pound-cake"?

Okay.

Now can you say "Chocolate-Chip Pound-Cake"? (Question: Is pound-cake hypenated?)

I made this the other day for a party. This recipe is a killer. It is SO good.

Chocolate Chip Poundcake
from The Moosewood Cookbook

1 pound buter, at room temperature
3 cups white sugar
6 eggs, at room temperature
1 cup milk
2 teaspoon vanilla extract
1 tablespoon baking powder
4 cups unbleached white flour
2 cups chocolate chips

Preheat oven to 350 degree F.

Grease and flour four small loaf pans, or a full sized bundt or tube pan.

Cream together butter and sugar with an electric mixer at high speed until light and fluffy. Add eggs, on at a time, beating well after each. Remove from electric mixer.
Sift together dry ingredients. Mix together milk and vanilla extract. Add dry and wet to butter mixture alternately, beginning and ending with dry. Add chocolate chips. Mix by hand, using a rubber spatula or wooden spoon, after each addition. Mix thoroughly, just enough to blend, without excess beating.
Pour into loaf or bundt or tube pan. Bake 1 hour, or until toothpick inserted in center comes out dry. After the cake cools ten minutes, turn it out onto a plate. Let cool completely before slicing.

Cinnamon Swirl Buns


So I made the cinnamon buns. yes. Those cinnamon buns.
What?
You don't know the ones I'm talking about?

I'm talking about the cinnamon buns that had me drooling from the first glance.

Yep. I'm talking about these babies:http://smittenkitchen.com/2009/04/cinnamon-swirl-buns-so-much-news/

I finally made them.

Boy were they good. Muy delicioso.

Granted, anything with cream cheese frosting is bound to be pretty delicious.

Cinnamon Swirl Buns with Cream Cheese Glaze
Adapted SmittenKitchen who adapted it from Molly Wizenberg’s recipe in Bon Appetit, March 2008,

Makes 18 buns.

Dough
1 cup whole milk
3 tablespoons unsalted butter
3 1/2 cups (or more) unbleached all purpose flour, divided
1/2 cup sugar
1 large egg
2 1/4 teaspoons rapid-rise or instant yeast (from 1 envelope yeast)
1 teaspoon salt
Nonstick vegetable oil spray

Filling
3/4 cup (packed) golden brown sugar
2 tablespoons ground cinnamon
1/4 cup (1/2 stick) unsalted butter, at room temperature
Pinch of salt

Glaze
4 ounces cream cheese, at room temperature
1 cup powdered sugar
1/4 cup (1/2 stick) unsalted butter, room temperature
1/2 teaspoon vanilla extract

For dough: Combine milk and butter in glass measuring cup. Microwave on high until butter melts and mixture is just warmed to 120°F to 130°F, about 30 to 45 seconds. Pour into bowl of stand mixer fitted with paddle attachment. Add 1 cup flour, sugar, egg, yeast, and salt. Beat on low speed 3 minutes, stopping occasionally to scrape down sides of bowl. Add additional 2 1/2 cups flour. Beat on low until flour is absorbed and dough is sticky, scraping down sides of bowl. If dough is very sticky, add more flour by tablespoonfuls until dough begins to form ball and pulls away from sides of bowl. Turn dough out onto lightly floured work surface. Knead until smooth and elastic, adding more flour if sticky, about 8 minutes. (You may also use a KitchenAid’s dough hook for this process.) Form into ball.

Lightly oil large bowl with nonstick spray. Transfer dough to bowl, turning to coat. Cover bowl with plastic wrap, then kitchen towel. Let dough rise in warm draft-free area until doubled in volume, about 2 hours.

For filling: Mix brown sugar, cinnamon and pinch of salt in medium bowl.

Press down dough. Transfer to floured work surface. Roll out to 15×11-inch rectangle. Spread butter over dough, leaving 1/2-inch border. Sprinkle cinnamon mixture evenly over butter. Starting at the longer side, roll dough into log, pinching gently to keep it rolled up. With seam side down, trim ends straight if they are uneven (we baked them in a ramekin, incapable of discarding such deliciousness) cut remaining dough crosswise with thin sharp knife (a good serrated worked well here) into 18 equal slices (each about 1/2 to 3/4 inch wide).

Spray two 9-inch square glass baking dishes (an 8-inch square metal pan worked just fine, too) with nonstick spray. Divide rolls between baking dishes, arranging cut side up (there will be almost no space between rolls). Cover baking dishes with plastic wrap, then kitchen towel. Let dough rise in warm draft-free area until almost doubled in volume, 40 to 45 minutes, though yours, like mine, may take longer. Don’t skimp on the double-rising time.

Position rack in center of oven and preheat to 375°F. Bake rolls until tops are golden, about 20 minutes. Remove from oven and invert immediately onto rack. Cool 10 minutes. Turn rolls right side up.

For glaze: Combine cream cheese, powdered sugar, butter, and vanilla in medium bowl. Using electric mixer, beat until smooth. Spread glaze on rolls. Serve warm or at room temperature.

Note: These buns were best the day they were baked. The second day, they were on the tough side. If you anticipate wanting them over a few days, glaze them to order, heating the buns beforehand to soften them up.

Sunday, November 22, 2009

Upside-Down Pear Chocolate Cake

So there's this book, it's called Rustic Fruit Desserts. It was featured in Gourmet, it's garnered rave reviews on Amazon. When I saw it at my local library I grabbed it like nobody's business. It's pretty inspiring, really lovely photos, a cornucopia of fruit desserts. The book is divided in 4 sections, spring, summer, fall winter. It had me wishing for summer cherries and berries, but never the less the winter/fall desserts look pretty luscious too.
I made the Upside-Down Pear Chocolate Cake.*
First you make a caramel, which you pour into a buttered pan. Once the caramel has hardened you layer on slices of pear. Over the pears you pour silky chocolate cake batter.
My cake was VERY wet, and though I baked it for an extra five minutes the center still wasn't completely cooked. I didn't really mind this though because the undercooked part took on an almost mouse-like quality.
For whatever reason the cake took on a complex, rummy flavor, which I found pretty delicious.
And here's the killer thing. it has a 1/2 stick of butter. HALF A STICK. TOTAL.
I am not even kidding.

Upside-Down Pear Chocolate Cake
from Rustic Fruit Desserts by Schreiber and Richardson


Fruit Topping:
1 cup granulated sugar
1/4 cup water
3 firm but ripe pear, peeled, cored and each cut into 12 slices (about 1 pound)

Butter a 9-inch baking pan (I used a spring form pan, which worked very well).
To make the fruit topping, put the sugar and water in a heavy saucepan (one with a tight-fitting lid) and stir until the sugar dissolves. Bring the mixture to a boil over medium heat, then cover and cook for 2 minutes. (Covering in this way allows steam to wash down the sides of pan, which prevents sugar crystals from forming.) Uncover the saucepan and continue to boil the sugar, gently and slowly swirling the pan as needed to cook the caramel evenly, until it becomes a dark amber color. Occasionally wash down the sides of the pan with a pastry brush dipped in cold water. Carefully pour the caramel into the prepared pan and allow it to harden. The pan will be very hot from the sugar, so take care in moving it if you need to. Fan the pear slices on top of the caramel in circle around the perimeter, filling in the center with remaining slices.
Preheat the oven to 350 F.

Cake:
1/4 cup unsalted butter
4 ounces dark chocolate, chopped
1 cup all purpose flour
1/3 cup unsweetened Dutch-processed cocoa powder
3/4 teaspoon baking soda
1/2 teaspoon salt
3/4 cup granulated sugar
2 eggs
1 teaspoon pure vanilla extract
1/2 cup whole milk
To make the cake, place the putter and chocolate in a small saucepan over low heat and melt, stirring occasionally. Sift the flour, cocoa, baking soda and salt together in a bowl of a stand mixer and add the sugar. Transfer the melted chocolate to a mixing bowl or the bowl of a stand mixer and add sugar. Using a a handheld mixer with beaters or a stand mixer with the paddle attachment, beat on medium speed for about 3 minutes, until light and fluffy. Add the eggs one at a time, scraping down the sides of the bowl after each addition. Stir in the vanilla. Stir in the flour mixture in three additions alternating with the milk in two additions, beginning and ending with the flour and scraping down the dies of the bowl occasionally.
Pour the batter into the prepared pan and bake in the middle of the oven for 40 to 45 minutes, or until the cake bounces back slightly when touched. Cool on a wire rack for 15 minutes, then invert the cake onto a plate, leaving the pan on top of the cake for 5 minutes before you remove it. Serve the cake warm topped with ice cream of whipped cream. Wrapped in plastic wrap it will keep for up to 3 days at room temperature.

*Please make this. This cake dressy enough for a sophisticated dinner but informal enough to cut slices while looking for "real food" in the refrigerator.

Saturday, November 7, 2009

Lemon Bars


There are certain things I associate with certain people. When I think of my mom I think of irises, and white handmade pottery and lemon bars. My mom loves lemon bars. 

Even more so, I have a strong emotional tie to lemon bars. One of my friends was in the hospital, and we bought her some lemon bars, she was very, very ill and never really ate food, only picked at it. I remember watching her pick at the lemon bar, and wanting her to just EAT IT ALREADY. 

Perhaps it's surprising, considering how strongly I feel about lemon bars, that I'd never made them until a few weeks ago, but life works in funny ways, and I finally found the perfect recipe. The one that sang to me. 
The one that seemed just right. 

Lemon Bars on Brown Butter Shortbread
from Tartine

Crust: 

1/2 cup confectioners sugar
1 1/2 cups all-purpose flour
3/4 cup unsalted butter
pine nuts (optional) 1/2 cup

Filling:

1/2 cup all-purpose flour
2 1/4 cups sugar
1 cup + 2 tbsp lemon juice
grated zest of 1 lemon
6 large whole eggs
1 large egg yolk
pinch of salt

Preheat oven to 350 F. Butter a 9x13 inch baking pan. 

To make crust, sift the confectioners' sugar into the bowl of a stand mixer fitted with the paddle attachment. Add the flour and stir to mix. Add the butter and pine nuts (if using) and beat on low speed until a smooth dough forms. 
Transfer the dough to the prepared pan and press evenly into the bottom and 1/2 inch up the sides of the pan. It should be about 1/4 inch thick. To help even out the crust use the flat bottom of any type of cup, pressing down firmly. Line the crust with parchment paper and fill with pie weights. Bake the crust until it colors evenly to a deep golden brown, 25 to 35 minutes. Rotate pan 180 degrees if the crust appears to baking unevenly. 

While crust is baking, make the filling: Sift the flour into a mixing bowl. Add sugar and whisk until blended. Add the lemon juice and zest and stir to dissolve the sugar. In a separate mixing bowl, whisk the whole eggs and egg yolk with the salt. Add the eggs to the lemon mixture and whisk until mixed. 

When the crust is ready, pull out the oven rack holding the crust and pour the filling directly into the hot pan. (It's easiest to pour the custard into the pan if the pan is in the oven.) If the crust has come out of the oven and cooled before you have finished making the filling, put it back in for a few minutes so that it is hot when the custard is poured into it. Reduce oven temperature to 300 F and bake just until the center of the custard is no longer wobbly, 30 to 40 minutes. 

Let cool completely on a wire rack, then cover and chill well before cutting. using a sharp knife, cut into 12 squares, or as desired. If you like, dust the tops of the squares with confectioners' sugar. They will keep in an airtight container or well covered in the baking dish in the refrigerator for up to 4 days. 

Monday, November 2, 2009

Random Failures

My official new goal is to ACTUALLY post. Yeah, I know, remarkable. 
I've had some disappointing food failures lately, the most disgusting involving butterscotch chips and cashews. 
The official new policy is to never, ever do anything with butterscotch chips AGAIN. 
Ever. 
Also I made a cauliflower, this one: http://smittenkitchen.com/2009/10/cauliflower-with-almonds-raisins-and-capers/
which is supposed to be cauliflower for non-cauliflower eaters. It wasn't too bad. Not my favorite, but not bad either. Then my Dad smelled it, just smelled it and he started yelling about how much he loathed it and opened all the doors and windows to get rid of "The Smell" because apparently it was making him gag. 
Yep. I know. 

Right now I'm craving savory tarts, such as quiche, also doughnuts. Also Payday candy bars. And nuts. Lots of cashews and stuff. And crisp apples. And french toast. 

I've been a bit sick for the past two days as well as insanely busy and also very impatient with the world, but I'm on this folks. This whole "Blog Thing" is going to happen. 

Thursday, October 22, 2009

Maria's Lovey's Food and Wine's Brownies OR the Simplest Brownies Imaginable


Our family friends Maria and Paul are pretty cool people. They moved into a house down the street a few years ago and I watch their house when they're traveling. Maria used to work for a catering company and she has an incredible cookbook collection. She's also an awesome cook, and on Labor Day she and Paul had a party. For dessert they had watermelon and brownies and ice cream. I've never been a hardcore brownie eater, but these brownies.... I melted with delight, they're scrumptious. These brownies are, as my dad would say, all that and a bag of chips. Seriously. 
Maria promised me that the recipe was the simplest thing imaginable and  gave it to me. She also left me with the very important instruction BEAT WITH A WOODEN SPOON, she said she wasn't sure why but those were the directions in the recipe and she's always followed them. I'll tell you why to beat with a wooden spoon. It increases DELICIOUSNESS. 

Maria's Lovey's Brownies from Food and Wine March 1990

8 oz. unsalted butter
4 oz. unsweetened chocolate
2 cups sugar
4 eggs at room temp
1 teaspoon vanilla
1 cup flour
1/2 teaspoon salt
1 cup coarsely chopped pecans or walnuts

Preheat oven to 350 degrees, grease (or line with foil and spray) a 13x9x2 pan.

Melt butter and chopped chocolate in microwave (about 1 1/2 minutes), stir to finish melting chocolate
Add sugar and stir with WOODEN SPOON* until mixed.
Beat in eggs one at a time until mixture is shiny and each egg is incorporated
Add vanilla, flour and salt. Add nuts. 

Bake for 30 minutes and cool completely in pan before cutting. The brownies will be moist and soft in the inside and crusty on top. 

* (Maria's note) Use only a wooden spoon to mix ingredients- don't know why but those were the directions and I have always done it. 

Wednesday, October 7, 2009

Perfect All-American Chocolate Butter Cake


The CAKE BIBLE. It sounds intimidating. But life is all about conquering fear and freeing yourself from inhibitions right?  So I made a chocolate cake with butter cream frosting. It was pretty damn good. A bit flat perhaps, because we had no cake flour, but still, pretty damn delicious. You should make it. You should eat it. 

It took an afternoon.It's a light chocolate cake. Soft, cakey, and when smeared with buttercream... In brief it lasted a day at my house. That's right, one day. 


Perfect All-American Chocolate Butter Cake

The Cake Bible by Rose Levy Beranbaum


1/2 cup + 3 tablespoons (lightly spooned into cup)

1 liquid cup boiling water

3 large eggs

2 1/4 teaspoons vanilla

2 1/4 cups cake flour

1 1/2 cups sugar

1 tablespoon baking powder

3/4 teaspoons salt

1 cup unsalted butter, softened


Preheat oven to 350 degrees.


In a medium bowl whisk together cocoa and boiling water until smooth. Cool to room temperature. 

In another bowl lightly combine the eggs, 1/4 of the cocoa mixture and vanilla. 

In a large mixing bowl combine the remaining dry ingredients and mix on low speed for 30 seconds to blend. Add the butter and remaining cocoa mixture. Mix on low speed until the dry ingredients are moistened. Increase to medium speed (high speed if using a hand mixer) and beat for 1 1/2 minutes to aerate and develop the cake's structure. Scrape down the sides. Gradually add the egg mixture in 3 batches, beating for 20 seconds after each addition to incorporate the ingredients. Scrape down the sides. 


Scrape the batter into the prepared pans and smooth the surface with a spatula. The pans will be about half full. Bake 25 to 35 minutes or until a tester inserted near the center comes out clean and the cake springs back when pressed lightly in the center. Cakes should start to shrink from the sides of pans only after removal from oven.

Let cakes cool in pans on racks for 10 minutes. Loosen sides and invert onto cooling racks. To prevent splitting reinvert so that tops are up. Cool completely before frosting. 


Classic Buttercream


6 large egg yolks

1 cup sugar

1/2 cup water

2 cups unsalted butter, softened

Optional: Liqueur or eau-de-vie of your choice 


Have ready a greased 1-cup heatproof glass measure near the range.

In a bowl beat the yolks with an electric mixer until light in color. Meanwhile, combine the sugar and water in a small saucepan (Preferable w/non-stick lining.) and heat, stirring constantly, until the sugar dissolves and the syrup is boiling. Stop stirring and boil to the soft-ball stage or 238 degrees F. Immediately transfer syrup to the glass measure to stop the cooking

If using an electric hand-held mixer, beat the syrup into the yolks in a steady stream. Avoid getting syrup directly onto beaters. If using a stand mixer, pour a small amount of syrup over the yolks with the mixer turned off. Immediately beat at high speed for 5 seconds. Stop the mixer and add a larger amount of syrup. Beat at high speed for 5 seconds. Continue with rest of syrup. Continue beating until completely cool. 

Gradually beat in the butter and, if desired optional flavoring. Place in an airtight bowl. Bring to room temperature before using. Rebeat if necessary to restore texture. 


Thursday, October 1, 2009

Buckwheat pancakes, or Something New


Pancakes. Who doesn't love them? Hot, steaming, right off the griddle, doused in syrup and butter. What could be more delicious? 
Still on my Molly Wizenberg kick I made her buckwheat pancakes. Mostly because I had never had buckwheat. And also because I wanted to try something new. 
I love trying cooking new things. It's probably a bit of a reaction to my parents. I've grown up on three things, rice, beans, and homemade bread. In that order. With some homemade salsa thrown in. I've been pretty darn spoiled by it actually my mom makes some MEAN beans and rice, and what ever you try and tell me, there's ain't nothin' that can compare to homemade bread still warm from the oven. 
But even with food as delicious as this after a while... It get a little tedious. Especially if you eat it every day. That's why I like to try new things, and I know that, if they fail I'll always have my safety foods, rice, beans and homemade bread. 
So make these buckwheat pancakes, for something a little out of the ordinary. 
2/3 cup unbleached all-purpose flour
1/3 cup buckwheat flour
2 teaspoons sugar
1/2 teaspoon salt
1/2 teaspoon baking powder
1/4 teaspoon baking soda
3/4 cup buttermilk
1/4 cup plus 2 tablespoons milk
1 large egg, separated
2 tablespoons (1 ounce) unsalted butter, melted and cooled slightly 

In a large bowl, whisk together the flours, sugar, salt, baking powder and soda. 

Pour the buttermilk and milk into a medium bowl. Whisk the egg white into the milk mixture. In a small bowl use a fork to beat the yolk with the melted butter. Whisk the yolk mixture into the milk mixture. Pour the wet ingredients into the dry ingredients all at once, and whisk until combined. Do not overmix. The batter will be somewhat thick. 


Meanwhile heat a large nonstick skillet or griddle over medium-high heat. Brush the skill with oil. 


Ladle batter in scant 1/4 cupfuls into the skillet, taking care not to crowd them. When the underside of the pancakes is nicely browned and the top starts to bubble and looks set around the edges, 2 to 3 minutes, flip them. Cook until the second side has browned. 1 to 2 minutes more. 


Serve warm, with syrup and and fruit and whipped cream and butter. Lots of butter. 


Sunday, September 27, 2009

Russian Grandmother's Apple Pie-Cake


I ADORE Dorie Greenspan. She's a baking guru, she's knows how to make good stuff. There had been a basket of apples festering on the kitchen counter, begging to be baked I just knew I couldn't go wrong. 

This is Russian Grandmother's Apple Pie-Cake. It's thick and dense and crumbly and heavy and not for the faint of heart. Don't get me wrong, it's good, it's not exactly everything I hoped for, but it's taken me a day and half a pie-cake to decide if I like it. I do. 

Dorie also suggests that this dough, which is basically cookie dough, can also be used to make old fashioned sugar cookies. How perfect is that? I love you Dorie. 


Russian Grandmother's Apple Pie-Cake


For the Dough:

2 sticks(8 ounces butter)

1 cup sugar

2 large eggs

1 tablespoon baking powder

1/2 teaspoon salt

Juice of 1 lemon

3 1/4 - 3 1/2 cups all-purpose flour


For the Apples:

10 medium apples 

squirt of fresh lemon juice

1 cup moist, plump raisins (dark or golden)

1/4  cup sugar

1 1/4 teaspoons ground cinnamon 


In a mixer  with paddle or with a hand-blender beat together butter and sugar on medium speed until smooth. Add eggs and continue to beat until mixture is light and fluffy.  Reduce mixer speed to low and add baking powder and salt. Add the lemon juice-dough will probably curdle but don't worry about it. Still working on low speed, slowly but steadily add 3 1/4 cups flour, mixing to incorporate it and scraping down bowl as needed. The dough is meant to be soft, but if it looks more like batter than dough at this point add extra 1/4 cup flour. Turn dough on work surface, gather into a ball and divide in half. Shape each half in a rectangle. Wrap dough in plastic wrap and refrigerate for at least 2 hours (dough will last up to 3 days) 


Peep and core apples, cut into slices 1/4 inch thick. Toss in bowl with lemon juice and raisins. Combine sugar and cinnamon, toss with apple/raisin mixture. 


Heat oven to 375 degrees F. Generously butter a 9-x-12 inch baking pan. 

Remove dough from fridge. Roll out on well floured surface or between sheets of wax paper. Or (you can do as I did) press and roll pieces of dough and patch them together in pan. DON'T worry, because of the baking powder everything will work out fine. 

Give apples a final toss in bowl and turn into pan, spread evenly across the bottom. 

Roll out 2nd piece of dough and position it over the apples. (This took me forever and this was so frustrating I just gave up, I did as I did for the bottom dough layer, VERY ARTISTICALLY patching top dough layer together. It looked beautiful.) 

Brush dough lightly with water and sprinkle with sugar over dough. Using a small sharp knife cut 6 to 8 evenly spaced slits in dough. 

Bake for 65 to 80 minutes or until dough is nice golden brown. Transfer the baking pan to a cooling rack and cool until warm or room temperature. You'll be tempted to eat this right away but I (Dorie) think the dough needs a little time to rest. (Because Dorie is so AWESOME I obey her every word. I waited.) 

Monday, September 21, 2009

No-Knead Rye Bread


BIG DISCOVERY. 
 No knead bread. 
Oh where have you been all my life???
The texture... It's to die for, the crust is swoon-worthy. It's that good. I've been craving hearty, brown, bread. So I made no-knead rye bread from Artisan Bread in Five Minutes a Day. All I'm going to say is: DELICIOUS. While I absolutely think this bread is delicious, next time I'd be interested to try a different recipe. Not that this one wasn't satisfying, but I'm intrigued by other recipes which have molasses and more rye flour. Also next time, I'll use fewer caraway seeds. Not that I don't like them, but I'm not exactly in love with them. 

Deli Style Rye
from Artisan Bread in Five Minutes a Day


This recipe calls for a lot of equipment, most of which I don't have. (No baking stone, no pizza peel etc, no boiler tray.) In this regard I improvised a little. I just used baking sheets. And instead of a boiler tray used a little bread pan. 

3 cups lukewarm water
1 1/2 tablespoons granulated yeast (1 1/2 packets)
1 1/2 tablespoons salt
1 1/2 teaspoons caraway seeds, plus more for sprinkling on top
1 cup rye flour
5 1/2 cups unbleached all purpose flour
Cornmeal

Mix yeast, salt, and caraway seeds with water in a 5 quart bowl, or a lidded (not airtight) food container. 

Mix in remaining dry ingredients without kneading, using a spoon, a 14 cup capacity food processor(with dough attachment) or heavy duty stand mixer (with dough hook). If you're not using a machine you may need to use wet hands to incorporate the last bit of flour. 

Cover (not airtight) and allow to rest a room temperature until dough rises and collapses (or flattens on top), approximately 2 hours. 

The dough can be used immediately after the initial rise, though it is easier to handle when cold. (Lies. It was still difficult.) 

ON BAKING DAY, dust the surface of refrigerated dough with flour and cup off a one pound (grapefruit size) piece. Dust the piece with more flour and quickly shape it into a ball by stretching the sureface of the dough around to the bottom on all four sides, rotating the ball a quarter turn as you go. Elongate ball into an oval-shaped loaf. Allow to rest and rise on a cornmeal covered pizza peel (Or baking sheet.) for 40 minutes. 

TWENTY MINUTES BEFORE BAKING, preheat the oven to 450F, with a baking stone (Or baking sheet.) placed on the middle rack. Place an empty broiler tray on any other shelf that wont interfere with the rising bread.

Sprinkle with additional caraway seeds. Slash with deep parallel cuts across the loaf, using a serrated bread knife. 

Slide the loaves directly onto the hot stone (Or sheet.) Pour 1 cup of hot tap water into the broiler tray, and quickly close oven door. Bake for about 30 minutes, or until deeply browned and firm. Smaller or larger loaves will require adjustments in baking time. 

Saturday, September 12, 2009

Luscious Cake

I just read Molly Wizenberg's book A Homemade Life. It was great, about life and food and love and everything in between. But what I really loved were the recipes, they all seemed so simple and different and original. I knew, the second I finished the book, that I had to make her 'Winning Hearts and Minds Cake'. It's a very simple, french cake. It's ridiculously rich and chocolately and a snap to make. Almost like a brownie. It's luscious. That's the perfect word to describe this glorious cake. Luscious. 

'Winning Hearts and Minds Cake' from Molly Wizenbergs, A Homemade Life

7 ounces bittersweet chocolate
1 3/4 sticks (7 ounces) unsalted butter, cut into 1/2 inch cubes
1 cup plus 2 tablespoons granulated sugar
5 large eggs
1 tablespoon all-purpose flour

Preheat oven to 375, and butter and flour an 8 inch (I used a nine inch.) round cake pan. 
Pour chocolate and butter in a medium microwaveable bowl. Microwave on high for 30 seconds at a time, stirring often, until just smooth. When mixture is smooth, add sugar, stirring well to incorporate. Set batter aside to cool for 5 minutes. Then add eggs, one by one, stirring well after each addition. Add the flour, and stir to mix well. The batter should be dark and silky. 
Pour batter into prepared pan, and bake for about 25 minutes, or until top of cake is lightly crackled and the edges are puffed and center of cake looks set. (Molly says to set the timer for 20 minutes to start with and check cake every 2 minute after that, until it's ready. At 20 minutes the center of cake is still very jiggly. The cake is done when when the center jiggles only a little.)
Remove cake from oven to cooling rack, let cool in pan then flip and magically transfer cake to serving platter so that crackly side is up. 
Eat. 

I'm just going to say, that this cake is especially good cold. Of course, it's delicious warm and melty, but cold. Oh it's just sooo good. 

Friday, September 11, 2009

White Chocolate Goodness

I love to try new recipes. I love eating different things. Maybe it's because I've grown up on several foods, (beans, rice, homemade bread) that are ALWAYS THERE. It's comforting, to know on the one hand that beans, rice and bread will always be in the refrigerator, waiting for me, but sometimes, I get impatient and demand to be fed something different. 
I often resist making the same thing over and over again. 
But not these cookies. NEVER these cookies. 
These are cookies to eat everyday, all the time. They are that good. They are as good as the Dorie Greenspan O-Cookie-of-Cookies-the-Best-Chocolate-Chip. But these babies. The babies are some serious competition. 
As I said before. They're that good. 
My parents even, who are notorious white chocolate haters love these cookies. They even bought more white chocolate specifically for these. Like I said. They're that good. 

Crisp Salted Oatmeal White Chocolate Cookies

Adapted from Cooks Illustrated by SmittenKitchen 

1 cup all-purpose flour
3/4 teaspoon baking powder
1/2 teaspoon baking soda
1/4 teaspoon table salt
14 tablespoons (1 3/4 sticks) unsalted butter, slightly softened
1 cup sugar
1/4 cup packed light brown sugar
1 large egg
1 teaspoon vanilla extract
2 1/2 cups old-fashioned rolled oats

1 cup white chocolate chips

Optional: 1 cup dried cherries, coarsely chopped (Ooh so good.)

1/2 teapoon flaky sea salt (for sprinkling on top)

1. Preheat oven to 350 degrees. Line baking sheet with parchment paper or Silpat. Whisk flour, baking powder, baking soda, and table salt in a medium bowl.

2. Beat butter and sugars until light and fluffy. Scrape down bowl with rubber spatula, then add egg and vanilla and beat until incorporated. Scrape down bowl again. Add flour mixture gradually and mix until just incorporated and smooth. Gradually add oats and white chocolate and mix until well incorporated.

3. Divide dough into 24 equal portions, each about 2 tablespoons. Roll between palms into balls, then place on lined baking sheets about 2 1/2 inches apart. Using fingertips, gently press down each ball to about 3/4-inch thickness. (I never do this, I just spoon a little more than a tablespoon right on to the sheet and pat them down a little.) 

4. Sprinkle a flake or two of sea salt on each cookie

5. Bake until cookies are deep golden brown, about 13 to 16 minutes, rotating baking sheet halfway through. Transfer baking sheet to wire rack to cool.

6. Eat and moan with pleasure. 

Saturday, August 22, 2009

A Conversation Between Me and You

"So, like, this is a food blog, right?"
"That's right."
"So, like, where's the grub?"
"I've been busy, please don't judge me, I'm just starting to figure this whole thing out."
"Recipes baby, that's all I want, some recipes."

I know this is probably what you've been thinking. Thus, without further ado:


Dimply Plum Cake
Baking: From My Home to Yours by Dorie Greenspan

1 1/2 cups all-purpose flour
2 teaspoons baking powder
1/4 teaspoon salt
Scant 1/4 teaspoon cardamom
5 tablespoons unsalted butter, at room temperature
3/4 cup (packed) light brown sugar
2 large eggs
1/3 cup flavorless oil, such as canola or safflower
Grated zest of 1 orange
1 1/2 teaspoons pure vanilla extract
8 purple or red plums (or even Italian prune plums, when they are in season), halved and pitted

Center a rack in the oven and preheat the oven to 350°F. Butter an 8-inch square baking pan, dust the inside with flour, tap out the excess and put the pan on a baking sheet. 

Whisk the flour, baking powder, salt and cinnamon together.

Working with a mixer, beat the butter at medium speed until it’s soft and creamy, about 3 minutes. Add the sugar and beat for another 3 minutes, then add the eggs, one at a time, and beat for a minute after each egg goes in. Still working on medium speed, beat in the oil, zest and vanilla; the batter will look smooth and creamy, almost satiny. Reduce the mixer speed to low and add the dry ingredients, mixing only until they are incorporated.

Run a spatula around the bowl and under the batter, just to make sure there are no dry spots, then scrape the batter into the pan and smooth the top. Arrange the plums cut side up in the batter–Dorie says she usually makes four rows of four plum halves each–jiggling the plums a tad just so they settle comfortably into the batter.

Bake for about 30 to 40 minutes, or until the top is honey brown and puffed around the plums and a thin knife inserted into the center of the cake comes out clean. Transfer the cake to a rack and cool for 15 minutes during which time the plums juices will seep back into the cake then run a knife around the sides of the pan and unmold the cake. Invert and cool right side up.

Eat entire cake. Because there's fruit in it it's obviously health food, right?


Sunday, August 16, 2009

The Best Pie Crust


My favorite part of Waitress:

"What are you thinking about hon?"

"I'm thinking I'm gonna make an I-hate-my-husband-pie."

Pause.

"I don't think we can put that on the menu hon."


It's an incredibly charming uplifting film. It's quirkly and loveable. And the story is centered around pie. Pie as a symbol of 

love. Pie as comfort. Pie is everything that people love and hope for. Some how pie dough has a reputation for trickiness. And certainly I've

had some miserably failed pie crusts. But this pie crust. This pie crust is something else. Simple. Thick. Flaky. Delicious. And when paired with a

filling of butter and cinnamon soaked apple, it's about as close to heaven on a fork as you can get. 


Basic Pie Crust from BAKED

1 cup (2 sticks) butter

3 cups flour

1 Tablespoon sugar

1 teaspoon salt

3/4 cup water


In a food processor whirl together the flour, sugar and salt. Cut the VERY COLD BUTTER into small pieces and blend until the mixture forms into pea-sized chunks. Dribble in water and whirl until dough just comes together. 

Take dough out of processor and knead until dough comes together. Divide into two, wrap in plastic wrap and place in freezer for one hour before using. 

Thursday, August 13, 2009

Evolution of a Sandwich


Russian Grandmother's Apple Pie-Cake

I ADORE Dorie Greenspan. She's a baking guru, she's knows how to make good stuff. There had been a basket of apples festering on the kitchen counter, begging to be baked I just knew I couldn't go wrong. 
This is Russian Grandmother's Apple Pie-Cake. It's thick and dense and crumbly and heavy and not for the faint of heart. Don't get me wrong, it's good, it's not exactly everything I hoped for, but it's taken me a day and half a pie-cake to decide if I like it. I do. 
Dorie also suggests that this dough, which is basically cookie dough, can also be used to make old fashioned sugar cookies. How perfect is that? I love you Dorie. 

Russian Grandmother's Apple Pie-Cake

For the Dough:
2 sticks(8 ounces butter)
1 cup sugar
2 large eggs
1 tablespoon baking powder
1/2 teaspoon salt
Juice of 1 lemon
3 1/4 - 3 1/2 cups all-purpose flour

For the Apples:
10 medium apples 
squirt of fresh lemon juice
1 cup moist, plump raisins (dark or golden)
1/4  cup sugar
1 1/4 teaspoons ground cinnamon 

In a mixer  with paddle or with a hand-blender beat together butter and sugar on medium speed until smooth. Add eggs and continue to beat until mixture is light and fluffy.  Reduce mixer speed to low and add baking powder and salt. Add the lemon juice-dough will probably curdle but don't worry about it. Still working on low speed, slowly but steadily add 3 1/4 cups flour, mixing to incorporate it and scraping down bowl as needed. The dough is meant to be soft, but if it looks more like batter than dough at this point add extra 1/4 cup flour. Turn dough on work surface, gather into a ball and divide in half. Shape each half in a rectangle. Wrap dough in plastic wrap and refrigerate for at least 2 hours (dough will last up to 3 days) 

Peep and core apples, cut into slices 1/4 inch thick. Toss in bowl with lemon juice and raisins. Combine sugar and cinnamon, toss with apple/raisin mixture. 

Heat oven to 375 degrees F. Generously butter a 9-x-12 inch baking pan. 
Remove dough from fridge. Roll out on well floured surface or between sheets of wax paper. Or (you can do as I did) press and roll pieces of dough and patch them together in pan. DON'T worry, because of the baking powder everything will work out fine. 
Give apples a final toss in bowl and turn into pan, spread evenly across the bottom. 
Roll out 2nd piece of dough and position it over the apples. (This took me forever and this was so frustrating I just gave up, I did as I did for the bottom dough layer, VERY ARTISTICALLY patching top dough layer together. It looked beautiful.) 
Brush dough lightly with water and sprinkle with sugar over dough. Using a small sharp knife cut 6 to 8 evenly spaced slits in dough. 
Bake for 65 to 80 minutes or until dough is nice golden brown. Transfer the baking pan to a cooling rack and cool until warm or room temperature. You'll be tempted to eat this right away but I (Dorie) think the dough needs a little time to rest. (Because Dorie is so AWESOME I obey her every word. I waited.) 

Wednesday, August 12, 2009

To sum it up

I have had a very busy summer. I've been involved in three shows, in the span of about two months. It's been hard, getting out of my comfort zone and meeting new people, as well as challenging myself as an actress and singer, but in the end it's all been very rewarding. 
I've spent all summer learning how much I don't know, and while it's been frustrating on the one hand, on the other, I'm very excited about the coming school year, because I love to learn new things. 
Some interesting books I've read lately:
Bird by Bird, an interesting, thoughtful book on the joy and pain of writing. 
The Pursuit of Love. An enjoyable, short novel on the large, very British Radlett family, the descriptions of Paris were lovely. Very witty. 

Around the Bloc. One of the best travelogues I've ever read, the narrator is a young woman, struggling with her identity as a Texan-Chicana. She travels through Russia, China and Cuba. Now I want to visit all those places. Even Russia, a country, which I had previously never in a million years wished to visit. I ate it up, truly an awesome read. 
I liked this book, but didn't love it. I love fairy tales but this book felt rather heavy, as if everything had Meaning. Perhaps this says something about my lazy thinking, I simply let things slip by me instead of reading closely and really figuring out what the author was really trying to say. The parts about painting, tulips and art were very interesting. It is however, a good book. 


Thursday, July 30, 2009

Fave Pics


It always bothers me when other bloggers post their "Fave Pics of the Week". Mostly because I'm not too into abbreviations such as "Fave" or "Pic". 
However, here are some of my Favorite Pictures of the Week, from around the web. (My apologies, I have no idea where they came from.)


Sunday, July 26, 2009

EGGS


Dear Blog,
I promise I have not been neglecting you on purpose. It's just that I'm involved in this very consuming thing called Theater, and it leaves very little time for anything. 
I do, however, have something exciting to report. 
I like eggs. 
It's official. 
For years now I've disliked eggs. That's putting it mildly. I loathed eggs. Until one day, I CRAVED frittata. Oh my it was delicious. And then I had a poached egg. But I still refused to eat scrambled eggs. 
Until this morning, when my mom made some kick ass migas. 
I'm so pleased that I liked them. 
Liking something I've never liked before just THRILLS me. 
Don't even get me started on how much I love deviled eggs.
love, 
mary cherry

Monday, June 29, 2009

Goals

It’s midsummer and I’m not sure what I’ve accomplished. 

Here’s my list of summer goals, food and otherwise:

1. Make croquembouche

2. Make ice cream

3. Fried Pie 

4. Get my drivers permit

5. Read Middlemarch


I think these are some pretty good goals. I’ve decided to make the croquembouche for my brothers fourteenth birthday, it’s quite a sophisticated dessert, but he’s a pretty sophisticated boy. It’s unfortunate that I can’t pronounce it.  

The ice cream is just one of those things I HAVE to do, the thought of homemade ice cream keeps hovering on the hungry fringes of my mind, I can’t decide - peach, blueberry, strawberry? I’ll probably end up doing a Dorie Greenspan recipe, she explains everything so clearly.

Fried handpies. Need I say more?
I feel like a failure, I’ve been sixteen for nearly six months now, and not only am I not driving, but I’m don’t even have my stupid permit. 

I started Middlemarch in early May, and despite the fact that I got about a hundred pages into it, I got involved with another book, and I forgot all about it. 

Fortunately I feel much better in my head, a few more decisions under my belt that make me feel as if I’m going somewhere. 

Obstacles are those fearful things you see when you take your eyes off the goal. 

-Henry Ford

Wednesday, June 24, 2009

mmmmm

Sometimes I get cravings for things I don't even like. Like asparagus. And coffee. 
I know that's a ridiculous thing to say, I mean, who doesn't like coffee? Or asparagus for that matter?
But lately, all I'd been wanting was coffee ice cream. Or coffee with ice cream. Or ice cream with coffee. 
It doesn't matter. The point is, my craving wouldn't go away. Finally, today, I pulled some vanilla bean ice cream out of the freezer and blended it with ice, milk, and of course, coffee. I would have taken a picture of it. 
Except it was gone so fast. 
I drank it all. 

And now I feel better. Way better

Saturday, June 20, 2009

The Reason I'm Here.

I'm here because I like to bake. A lot. Cookies. Pie. Cake. You name it, I bake it. 
These are the best chocolate chip cookies. Ever. Dorie Greenspan is the goddess of baked goods. 
These are unbelievably good. So good that a dozen will disappear more quickly than you can possibly imagine. 

Dorie Greenspan's BEST CHOCOLATE CHIP COOKIES
2 cups all-purpose flour
1 teaspoon salt
3/4 teaspoon baking soda
2 sticks unsalted butter, at room temperature
1 cup sugar
2/3 cup (packed) light brown sugar
2 teaspoons pure vanilla extract
2 large eggs
12 ounces bittersweet chocolate, chopped into chips or 2 cups store-bought chips or chunks
1 cup finely chopped pecans or walnuts 

Preheat oven to 375 degrees F.
Whisk together flour, salt and baking soda.
Working with a stand mixer w/paddle attachment, or with a hand mixer in a large bowl, beat the butter on medium speed for about 1 minute until smooth. Add the sugars and beat until well blended. Beat in vanilla. Add eggs one at a time, beating for 1 minute after each egg goes in. Reduce mixer speed to low and add dry ingredients in 3 portions, mixing only until each addition is incorporated. On low speed mix in chocolate and nuts. 
Spoon on tablespoons of dough onto baking sheets, leaving about 2 inches between spoonfuls. 
Bake cookies, one sheet at a time, for 10 to 12 minutes. Until light brown on edges and golden in center. 
Allow cookies to rest for one minute. Then using spatula transfer to cooling rack. 

Friday, June 19, 2009


Things i like
2. hats


3. dance
4. converse allstars


5. doughnuts

these are the beautiful things in my life that make me happy. oh so happy. hopefully this blogging thing will become a habit. i am so excited.